Adhesion — the bond strength between the powder coating and the substrate — is the most fundamental performance property of any coating system. A coating with excellent hardness, chemical resistance, and weathering performance is worthless if it does not stay bonded to the substrate. Adhesion failures manifest as peeling, flaking, delamination, and blistering, all of which expose the substrate to corrosion and render the coating non-functional.
Guides
How to Test Powder Coating Adhesion: Cross-Hatch, Pull-Off, and Pass/Fail Criteria
Sundial Powder Coating·April 22, 2026·13 min
Adhesion depends on the entire process chain: surface preparation, pretreatment, powder application, and curing. A failure at any stage can produce a coating that looks perfect but has inadequate adhesion. This is why adhesion testing is a standard requirement in virtually every powder coating specification — it is the quality gate that confirms the entire process has been executed correctly.
Ready to Start Your Project?
From one-off customs to 15,000-part production runs — get precise pricing in 24 hours.
On This Page
Why Adhesion Testing Matters for Powder Coating Quality
Two standardized test methods dominate adhesion testing in the powder coating industry: the cross-hatch tape test (ASTM D3359 / ISO 2409) and the pull-off adhesion test (ASTM D4541 / ISO 4624). The cross-hatch test is a simple, fast, qualitative method suitable for production quality control. The pull-off test is a quantitative method that measures the actual bond strength in megapascals, used for specification compliance, failure investigation, and process qualification.
This guide covers both methods in detail, including equipment requirements, step-by-step procedures, result interpretation, and the common pitfalls that lead to inaccurate test results.
Cross-Hatch Tape Test: ASTM D3359 Method B
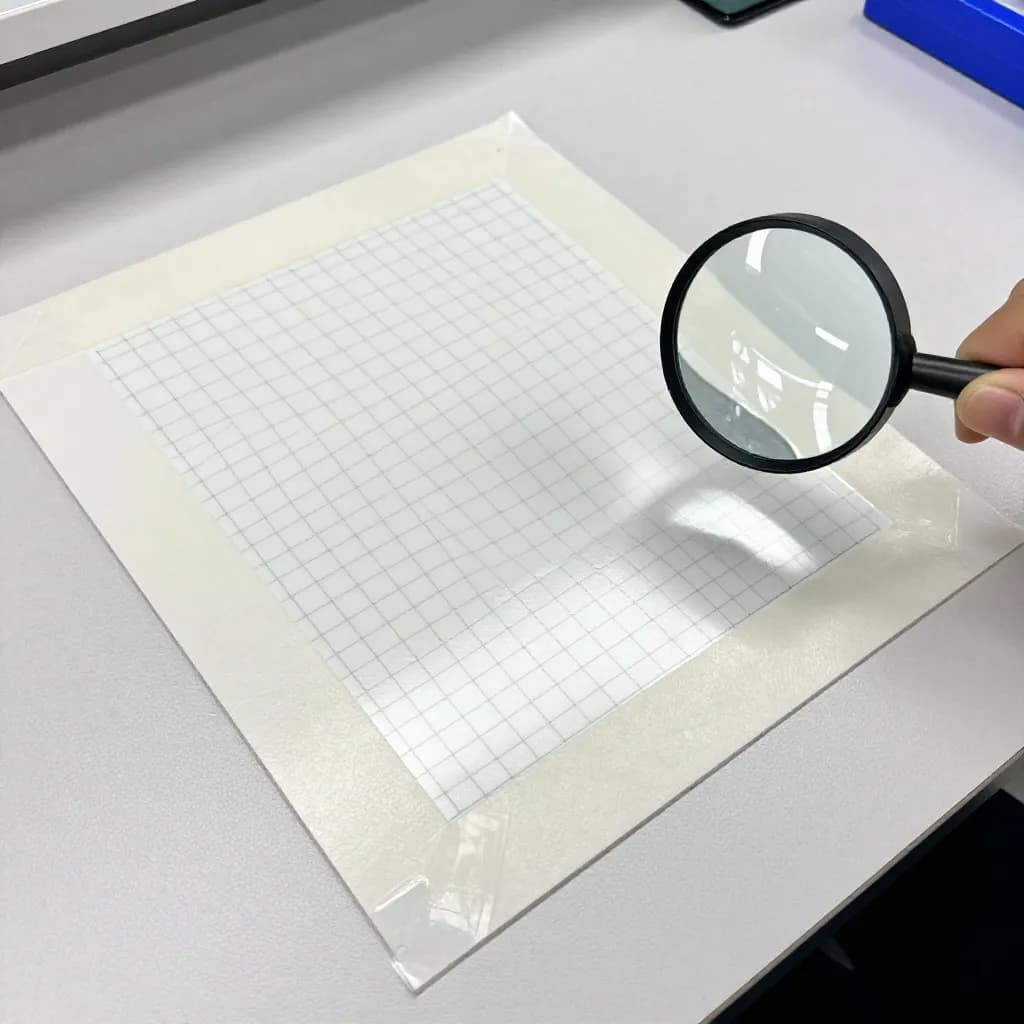
The cross-hatch tape test is the most widely used adhesion test in powder coating production because it is fast, inexpensive, and requires minimal equipment. The test involves cutting a grid pattern through the coating to the substrate, applying and removing a standardized pressure-sensitive tape, and evaluating the amount of coating removed by the tape.
Equipment required includes a multi-blade cutting tool or a single-blade cutter with a guide, standardized adhesion test tape (typically 25 mm wide, with a specified adhesion strength of 36 ± 2.5 N per 25 mm width), a magnifying glass or loupe for evaluation, and good lighting. The cutting tool must produce clean cuts through the coating to the substrate without tearing or chipping the coating beyond the cut lines.
The cutting tool spacing depends on the coating thickness. For coatings up to 50 microns, use 1 mm spacing between cuts. For coatings from 50 to 125 microns — which covers most powder coatings — use 2 mm spacing. For coatings above 125 microns, use 3 mm spacing. The grid consists of two sets of parallel cuts at 90 degrees to each other, creating a pattern of small squares.
Make the cuts with firm, even pressure in a single stroke. The blade must penetrate completely through the coating to the substrate — incomplete cuts that do not reach the substrate invalidate the test. After cutting, brush the grid area lightly with a soft brush to remove any loose coating debris. Apply the test tape over the grid, pressing firmly with a fingertip or eraser to ensure full contact with the coating surface and the cut edges. Wait 60-90 seconds, then remove the tape with a smooth, steady pull at an angle of approximately 180 degrees (pulling the tape back on itself).
Interpreting Cross-Hatch Test Results
After removing the tape, examine the grid area and the tape surface under good lighting, using magnification if necessary. The result is classified on a scale from 5B (best) to 0B (worst) according to ASTM D3359, based on the percentage of the grid area from which coating has been removed.
5B — The edges of the cuts are completely smooth; none of the grid squares are detached. This is the best possible result and indicates excellent adhesion. Most powder coating specifications require a minimum rating of 4B or 5B.
4B — Small flakes of coating are detached at the intersections of the cuts. Less than 5% of the grid area is affected. This is generally considered acceptable for most applications.
3B — Small flakes of coating are detached along the edges and at intersections of the cuts. The affected area is 5-15% of the grid. This result is marginal and may or may not meet specification depending on the application requirements.
2B — The coating has flaked along the edges and on parts of the squares. The affected area is 15-35% of the grid. This indicates poor adhesion that would fail most specifications.
1B — The coating has flaked along the edges of the cuts in large ribbons, and whole squares have detached. The affected area is 35-65% of the grid.
0B — Flaking and detachment is worse than 1B, with more than 65% of the grid area affected. This indicates complete adhesion failure.
When reporting results, note the classification, the test location on the part, the coating thickness at the test location, and any observations about the failure mode — whether the coating separated from the substrate (adhesive failure) or within the coating layer itself (cohesive failure). Adhesive failure points to surface preparation or pretreatment problems; cohesive failure may indicate cure issues or coating defects.
Pull-Off Adhesion Test: ASTM D4541
The pull-off adhesion test provides a quantitative measurement of coating adhesion in megapascals (MPa) or pounds per square inch (psi). A metal dolly (test stub) is bonded to the coating surface with a high-strength adhesive, and a calibrated pulling device applies a tensile force perpendicular to the surface until the coating detaches. The force at detachment, divided by the dolly area, gives the adhesion strength.
Equipment required includes aluminum or steel dollies (typically 20 mm diameter), a high-strength two-part epoxy adhesive rated for the expected pull-off forces, a portable pull-off adhesion tester with a calibrated force gauge, and a scoring tool to cut around the dolly perimeter before testing.
Prepare the test by lightly abrading the coating surface at the test location with fine sandpaper (320-400 grit) to provide a key for the adhesive. Clean the abraded area and the dolly face with solvent to remove dust and oils. Mix the two-part epoxy adhesive according to the manufacturer's instructions and apply a thin, uniform layer to the dolly face. Press the dolly firmly onto the coating surface, ensuring full contact with no air bubbles or voids in the adhesive layer. Allow the adhesive to cure fully — typically 24 hours at room temperature or accelerated with gentle heat per the adhesive manufacturer's recommendations.
After the adhesive has cured, score around the dolly perimeter with a circular cutting tool to isolate the test area from the surrounding coating. This ensures that the test measures the adhesion of the defined area rather than the shear strength of the surrounding coating. Attach the pull-off tester to the dolly and apply force at a steady rate — typically 1 MPa per second — until detachment occurs. Record the peak force and calculate the adhesion strength.
Interpreting Pull-Off Test Results and Failure Modes
The pull-off test provides two pieces of information: the adhesion strength value and the failure mode. Both are important for understanding coating performance and diagnosing problems.
Adhesion strength values for well-prepared and properly cured powder coatings on steel typically range from 5 to 15 MPa (725-2175 psi). On aluminum, values are typically 3 to 10 MPa. The minimum acceptable adhesion strength depends on the specification — many industrial specifications require a minimum of 3.5-5.0 MPa, while more demanding specifications may require 7.0 MPa or higher.
The failure mode describes where the separation occurred and is classified into several categories. Adhesive failure between the coating and the substrate (A/B failure) indicates that the bond between the coating and the metal is the weakest link — this points to surface preparation or pretreatment problems. Cohesive failure within the coating layer (B failure) indicates that the coating itself is weaker than the bond to the substrate — this may indicate under-cure, contamination within the coating, or excessive film thickness.
Failure between the coating and the test adhesive (Y/B failure) indicates that the test adhesive bond was weaker than the coating adhesion — the test result is a minimum value, and the actual coating adhesion is higher than the recorded number. This is actually a good result, though it does not provide the true adhesion value. Using a stronger adhesive or improving the surface preparation of the coating before bonding the dolly may yield a higher result.
Mixed-mode failures — where the fracture surface shows areas of different failure types — are common and should be reported as percentages of each failure mode. For example, a result might be reported as 8.5 MPa with 60% adhesive failure at the coating-substrate interface and 40% cohesive failure within the coating. This mixed result suggests that both the substrate bond and the coating integrity are near their limits.
Test Frequency, Location, and Sampling Plans
How often to test and where to test on the part are practical decisions that balance quality assurance against testing cost and the destructive nature of the tests. Both the cross-hatch and pull-off tests damage the coating at the test location, so testing must be performed on sacrificial areas, test panels, or parts that will be scrapped.
For production quality control, the cross-hatch test is typically performed on test panels that are coated alongside the production parts. These panels are prepared from the same substrate material with the same surface preparation and pretreatment as the production parts, ensuring that the test results are representative. Test at least one panel per batch, per shift, or per color change — the frequency depends on the specification requirements and the process stability.
Pull-off testing is less frequent due to the longer preparation time and higher cost. It is typically performed during process qualification, at the start of production for a new part or specification, periodically as a verification of ongoing process capability, and whenever cross-hatch test results are marginal or failing.
Test locations should include areas that are most likely to have adhesion problems: recessed areas where surface preparation may be less thorough, areas near welds where heat-affected zones may affect adhesion, edges and corners where coating thickness varies, and areas that were masked and demasked. If the test panel approach is used, the panel should be positioned in the coating line where it receives the same treatment as the most challenging areas of the production parts.
Document all adhesion test results with the test method, date, operator, part or panel identification, test location, coating thickness at the test location, and the result (classification for cross-hatch, force and failure mode for pull-off). This documentation provides traceability and supports trend analysis for process improvement.
Common Testing Errors and How to Avoid Them
The most common error in cross-hatch testing is using the wrong tape. Standard masking tape or office tape does not have the standardized adhesion strength required by ASTM D3359 and will produce unreliable results. Use only tape that meets the specification requirement — typically 3M 250 or equivalent with an adhesion strength of 36 ± 2.5 N per 25 mm width. Using tape with lower adhesion will make poor adhesion appear acceptable; using tape with higher adhesion will make good adhesion appear to fail.
Incomplete cuts that do not penetrate to the substrate are another frequent error. If the blade does not reach the substrate, the test evaluates the cohesive strength of the coating rather than the adhesion to the substrate. Use a sharp blade and firm, consistent pressure. Verify that cuts reach the substrate by examining the cut lines under magnification — the substrate should be visible at the bottom of each cut.
For pull-off testing, the most common error is inadequate adhesive cure. If the epoxy adhesive is not fully cured, it will fail before the coating adhesion is reached, producing artificially low results. Follow the adhesive manufacturer's cure schedule exactly, and verify cure by testing a dolly bonded to a bare metal surface — the adhesive should achieve its rated strength on bare metal before testing on coated surfaces.
Testing on coating that is too thick can produce misleadingly low results for both methods. Thick coatings are more likely to fail cohesively within the coating layer rather than at the coating-substrate interface, which may not reflect the actual adhesion quality. If cohesive failures are occurring, measure the coating thickness and consider whether it exceeds the powder manufacturer's recommended maximum. Test at the specified thickness range for meaningful adhesion data.
Environmental conditions affect test results. Perform adhesion testing at standard conditions — 23 ± 2°C and 50 ± 5% relative humidity — or note the actual conditions at the time of testing. Cold temperatures increase coating brittleness and may produce lower cross-hatch ratings. High humidity can affect tape adhesion and epoxy cure.
Frequently Asked Questions
What is a passing cross-hatch adhesion test result?
Most powder coating specifications require a minimum rating of 4B or 5B per ASTM D3359. A 5B rating means no coating was removed — the edges of all cuts are perfectly smooth. A 4B rating means less than 5% of the grid area was affected. Ratings of 3B or lower typically indicate adhesion problems requiring investigation.
What adhesion strength should powder coating achieve in a pull-off test?
Well-prepared powder coatings on steel typically achieve 5-15 MPa in pull-off testing. On aluminum, 3-10 MPa is typical. Most industrial specifications require a minimum of 3.5-5.0 MPa. The failure mode is as important as the value — adhesive failure at the substrate interface indicates preparation problems, while cohesive failure may indicate cure issues.
How often should adhesion testing be performed?
Cross-hatch testing should be performed at least once per batch, shift, or color change using test panels coated alongside production parts. Pull-off testing is performed during process qualification, at production start for new parts, and periodically for ongoing verification. Increase frequency if results are marginal or process changes have occurred.
What causes powder coating adhesion failure?
The most common causes are inadequate surface preparation (residual oil, insufficient blast profile), improper pretreatment (wrong chemistry, depleted solutions), contamination between preparation and coating, and under-cure. The failure mode in testing helps identify the cause — adhesive failure points to preparation issues, cohesive failure points to cure or coating problems.
Can you do adhesion testing on production parts?
Both cross-hatch and pull-off tests damage the coating at the test location, so they are typically performed on test panels rather than production parts. If testing on production parts is required, test in areas that will be hidden in the final assembly or on parts designated as sacrificial samples from the production batch.
Ready to Start Your Project?
From one-off customs to 15,000-part production runs — get precise pricing in 24 hours.