Not all powder coating defects require the same repair approach. The correct repair method depends on the type of defect, its size and location, the end-use requirements of the part, and the economics of repair versus rejection. Choosing the wrong repair method wastes time and materials, and may produce a result that is worse than the original defect.
Guides
How to Fix Powder Coating Defects: Strip, Recoat, Spot Repair, and Touch-Up Methods
Sundial Powder Coating·April 22, 2026·13 min
Defects fall into several categories that determine the appropriate repair strategy. Surface contamination defects — fisheyes, craters, and seeds — are caused by foreign material in or on the coating and typically require stripping and recoating because the contamination is embedded in the cured film. Application defects — runs, sags, orange peel, and thin spots — may be repairable by sanding and recoating without full stripping if the underlying adhesion is sound. Mechanical damage — scratches, chips, and impact marks that occur after curing — can often be addressed with localized touch-up methods.
Ready to Start Your Project?
From one-off customs to 15,000-part production runs — get precise pricing in 24 hours.
On This Page
Assessing Powder Coating Defects Before Choosing a Repair Method
The location of the defect matters as much as its type. A small defect on a hidden surface may be acceptable as-is, while the same defect on a visible face requires repair. A defect near an edge or corner may be easier to blend with touch-up paint than a defect in the center of a large flat panel where any repair will be visible.
Before starting any repair, document the defect with photographs and measurements. Identify the root cause if possible — understanding why the defect occurred prevents recurrence on subsequent parts. Then evaluate the repair options against the quality requirements and choose the method that provides the best balance of quality, cost, and turnaround time.
Full Strip and Recoat: When Nothing Else Will Do
Stripping the entire coating and reapplying from scratch is the most thorough repair method and the only option for certain types of defects. It produces a result that is indistinguishable from a first-run coating, but it is also the most time-consuming and expensive repair approach.
Full strip and recoat is required when the defect is caused by contamination that has penetrated to the substrate surface — the contamination must be removed completely before recoating, and this is only possible by stripping the coating. It is also required when adhesion failure has occurred over a large area, when the wrong color or powder type was applied, or when the coating is severely under-cured and cannot be salvaged by additional baking.
The stripping method depends on the substrate material and the coating type. Chemical strippers, burn-off ovens, and abrasive blasting are the three main stripping methods, each with advantages and limitations covered in detail in the stripping guide. After stripping, the substrate must be re-prepared — cleaned, blasted, and pretreated — exactly as for a new part. Skipping or shortening the preparation steps after stripping is a common mistake that leads to adhesion problems on the recoated part.
After stripping and re-preparation, the part is coated and cured using the standard production process. The recoated part should be indistinguishable from a first-run part in appearance and performance. Inspect the recoated part carefully, paying particular attention to the area where the original defect was located, to confirm that the root cause has been eliminated.
The economics of strip and recoat must be weighed against the value of the part. For high-value parts — large fabrications, precision components, or parts with significant upstream processing — the cost of stripping and recoating is easily justified. For low-value parts, it may be more economical to scrap the defective part and coat a replacement.
Sanding and Recoating: Repairing Surface Defects Without Stripping
Many surface defects can be repaired by sanding the defective area and applying a new coat of powder over the existing coating, without stripping the entire part. This approach is faster and less expensive than full stripping but requires that the existing coating has good adhesion to the substrate and that the defect is limited to the surface of the coating.
Defects suitable for sand-and-recoat repair include runs and sags (excess coating that has flowed during curing), heavy orange peel, surface contamination that sits on top of the coating rather than penetrating to the substrate, and localized thin spots that need additional film build.
The sanding process creates a surface profile on the existing coating that promotes adhesion of the new powder layer. Use 180-320 grit sandpaper or a fine Scotch-Brite pad to abrade the defective area and the surrounding coating. Feather the edges of the sanded area to create a gradual transition between the sanded and unsanded coating. The sanded area should extend at least 25-50 mm beyond the defect in all directions to ensure good adhesion of the repair coat.
After sanding, clean the surface thoroughly to remove sanding dust and any contaminants. Blow off with clean compressed air and wipe with a tack cloth or solvent-dampened cloth. Any dust or contamination left on the sanded surface will cause defects in the repair coat.
Apply powder coating over the sanded area and cure according to the standard schedule. The new powder will melt and flow over the sanded surface, bonding to the abraded existing coating. The result should be a smooth, uniform surface with no visible transition between the original and repair coatings. On flat panels with gloss finishes, the repair area may be slightly visible due to differences in film build and surface texture — this is more acceptable on textured or matte finishes where the repair blends more easily.
Spot Repair with Powder Coating
Spot repair involves applying powder coating to a small, localized area rather than recoating the entire part. This is the fastest powder-based repair method but requires skill to achieve an acceptable result, particularly on visible surfaces with gloss or metallic finishes.
The spot repair process begins with preparing the defective area. For chips and scratches that expose the substrate, sand the damaged area to remove any loose coating and create a smooth transition to the surrounding intact coating. For surface defects in the existing coating, sand the defect smooth and feather the edges. Clean the prepared area thoroughly.
Apply powder to the repair area using a small-pattern gun nozzle or a dedicated touch-up gun. Reduce the powder flow rate and voltage to deposit a thin, controlled layer of powder over the repair area. Build the film thickness gradually, checking coverage between passes. The goal is to bring the repair area to the same film thickness as the surrounding coating without building excessive thickness that would be visible as a raised area.
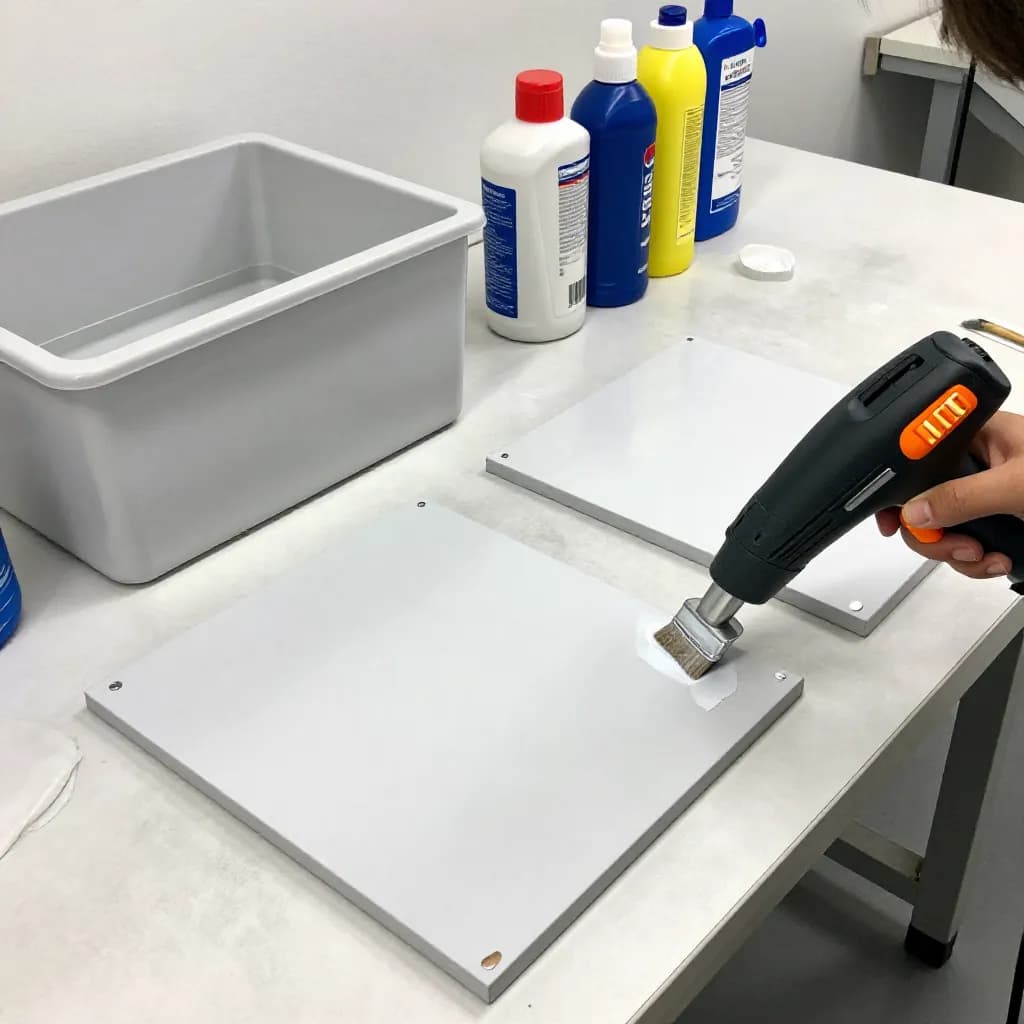
Curing the spot repair requires heating the repair area to the full cure temperature. For small parts, the entire part can be returned to the oven. For large parts that cannot fit in the oven or that would be damaged by a second full cure cycle, localized heating with an infrared lamp or heat gun can cure the repair area without affecting the rest of the part. Monitor the metal temperature in the repair area with a contact thermometer to ensure the cure schedule is achieved.
The main limitation of spot repair is the visible transition between the repair area and the surrounding original coating. On textured, matte, or dark-colored coatings, spot repairs can be virtually invisible. On high-gloss, light-colored, or metallic coatings, the repair area is often visible due to differences in gloss, texture, and color that result from the different thermal history of the repair area. For these finishes, full recoating may be necessary to achieve an acceptable appearance.
Touch-Up Paint for Minor Damage
Touch-up paint — liquid paint applied by brush, roller, or aerosol spray — is the simplest and fastest method for repairing minor powder coating damage such as small chips, scratches, and handling marks. It does not provide the same performance as a powder coating repair, but it is adequate for many applications where the primary concern is appearance rather than maximum corrosion or chemical resistance.
Touch-up paints for powder coating repair are available in several formulations. Air-dry acrylic lacquers are the most common, available in aerosol cans and small bottles with brush applicators. They dry quickly, are easy to apply, and are available in a wide range of standard colors. Two-component polyurethane touch-up paints provide better durability and chemical resistance than lacquers but require mixing before use and have a limited pot life.
Color matching is the critical challenge with touch-up paint. Even when the touch-up paint is nominally the same color as the powder coating, differences in gloss, texture, and undertone between the liquid paint and the powder coating can make the repair visible. Request touch-up paint from the powder manufacturer matched specifically to the powder color, or have a paint supplier create a custom match using a sample of the cured powder coating as a reference.
Application technique affects the visibility of the repair. For small chips, use a fine brush to apply paint only to the damaged area, building up thin layers to match the surrounding film level. For larger areas, aerosol spray provides a more uniform finish but requires masking the surrounding area to prevent overspray. Allow each layer to dry before applying the next, and do not build excessive thickness — thick touch-up paint is more visible than thin paint that matches the surrounding surface level.
Touch-up paint repairs should be considered temporary or cosmetic rather than permanent structural repairs. The liquid paint does not have the same cross-link density, chemical resistance, or UV stability as the original powder coating. In demanding environments, touch-up areas may degrade faster than the surrounding powder coating and require periodic re-application.
Choosing the Right Repair Method: A Decision Framework
Selecting the appropriate repair method requires balancing quality requirements, cost, turnaround time, and the specific characteristics of the defect. A systematic decision framework helps ensure consistent, appropriate repair decisions across the operation.
For defects caused by substrate contamination or adhesion failure, full strip and recoat is the only reliable option. These defects indicate a fundamental problem with the coating-substrate bond that cannot be corrected by surface-level repairs. Attempting to patch over an adhesion failure will result in the repair failing in the same way as the original coating.
For surface defects with sound underlying adhesion — runs, sags, orange peel, and surface contamination — sand and recoat is usually the most cost-effective approach. It preserves the existing coating-substrate bond and produces a result that is close to first-run quality. This method works well for both visible and hidden surfaces.
For localized mechanical damage on parts that are already installed or too large to reprocess — chips, scratches, and handling marks — touch-up paint is the practical choice. It provides immediate cosmetic improvement and basic corrosion protection at the damage site. Accept that the repair will be visible on high-gloss and light-colored finishes.
For high-value parts with critical appearance requirements, always default to the most thorough repair method that the situation allows. The cost of a proper repair is almost always less than the cost of a customer rejection or a field failure. For commodity parts with moderate appearance requirements, the most economical repair method that meets the acceptance criteria is the right choice.
Document all repairs in the quality record, including the defect type, root cause (if identified), repair method used, and the result of post-repair inspection. This documentation supports trend analysis that can identify recurring defect types and drive process improvements that reduce the need for repairs over time.
Preventing Defects: Reducing the Need for Repairs
The best repair strategy is prevention. Every defect that is prevented eliminates the cost of repair, the risk of an imperfect result, and the throughput loss from rework. Systematic defect prevention is more valuable than efficient defect repair.
Track defects by type, frequency, and root cause. Pareto analysis — ranking defect types by frequency — identifies the vital few defect types that account for the majority of rework. Focus improvement efforts on the top two or three defect types for maximum impact. Common high-frequency defects in powder coating operations include contamination (from inadequate cleaning or environmental sources), thin spots (from inconsistent application technique), and orange peel (from incorrect gun settings or powder condition).
Address root causes rather than symptoms. If contamination defects are frequent, investigate and eliminate the contamination source rather than becoming more efficient at stripping and recoating contaminated parts. If thin spots are common, improve operator training and gun maintenance rather than developing a faster spot repair process.
Implement process controls that catch problems before they produce defects. Pre-coating inspection of surface preparation quality, in-process monitoring of gun settings and film thickness, and post-coating inspection before curing all provide opportunities to identify and correct problems before they become cured-in defects that require repair.
Invest in operator training. Skilled operators produce fewer defects than untrained operators, regardless of the equipment quality. Training should cover not only the mechanics of powder application but also the recognition of defect precursors — the visual and tactile cues that indicate a problem is developing before it becomes a visible defect in the cured coating. Operators who can recognize and correct problems in real time produce dramatically fewer defects than operators who only discover problems after curing.
Frequently Asked Questions
Can you recoat powder coating without stripping?
Yes, if the existing coating has good adhesion and the defect is limited to the surface. Sand the defective area with 180-320 grit to create adhesion for the new coat, clean thoroughly, and apply powder coating over the sanded surface. This works well for runs, sags, orange peel, and thin spots but not for adhesion failures or substrate contamination.
How do you touch up powder coating chips?
For small chips, use color-matched touch-up paint applied with a fine brush in thin layers. Build up to match the surrounding film level. For larger damaged areas, aerosol spray touch-up paint provides a more uniform finish. Touch-up paint is a cosmetic repair and does not match the full performance of the original powder coating.
When should you strip and recoat vs spot repair?
Strip and recoat when the defect involves substrate contamination, adhesion failure, wrong color, or severe under-cure. Use spot repair for localized mechanical damage on parts with sound underlying coating. The decision also depends on appearance requirements — high-gloss visible surfaces usually need full recoating for an invisible repair.
Can you cure a spot repair with a heat gun?
Yes, for small repair areas on large parts that cannot be returned to the oven. Use an infrared lamp or heat gun to heat the repair area to the full cure temperature, monitoring with a contact thermometer. Ensure the metal temperature reaches the specified cure temperature for the required time. This method works but requires careful temperature control.
How do you prevent powder coating defects?
Track defects by type and root cause, then address the top causes systematically. Common prevention measures include thorough surface preparation, clean booth and equipment maintenance, proper gun settings and operator technique, correct cure profiles, and environmental controls to prevent contamination. Skilled operators and process monitoring catch problems before they become cured-in defects.
Ready to Start Your Project?
From one-off customs to 15,000-part production runs — get precise pricing in 24 hours.