The flashlight community is one of the most detail-oriented enthusiast groups in the EDC world. Collectors and users obsess over emitter types, driver circuits, beam profiles, and — increasingly — the finish on the flashlight body itself. Most production flashlights come with Type II or Type III anodizing, which provides a hard, thin, wear-resistant surface in a limited range of colors. But for enthusiasts who want something different, powder coating opens up a world of customization that anodizing cannot match.
Consumer
Powder Coating for Flashlight Bodies: Custom EDC Finishes Beyond Anodizing
Sundial Powder Coating·April 23, 2026·8 min
Powder coating a flashlight body is not about replacing anodizing for every application. Anodizing remains the superior choice for hard-use tactical lights where the thinnest possible finish and maximum abrasion resistance are priorities. But for custom builds, limited editions, collection pieces, and everyday carry lights where personal expression matters, powder coating offers color variety, texture options, and visual effects that anodizing simply cannot achieve.
Ready to Start Your Project?
From one-off customs to 15,000-part production runs — get precise pricing in 24 hours.
On This Page
The Flashlight Enthusiast's Finish Dilemma
The growing custom flashlight scene — driven by independent makers, modders, and small-batch manufacturers — has embraced powder coating as a way to differentiate their products. A custom flashlight in a unique powder coat color or texture stands out in a market dominated by black and grey anodized bodies, giving makers and buyers a way to express individual style.
Powder Coating vs. Anodizing for Flashlight Bodies
Understanding the differences between powder coating and anodizing helps flashlight enthusiasts choose the right finish for their needs. Anodizing is an electrochemical process that converts the surface layer of aluminum into aluminum oxide, creating an extremely hard, thin, integral finish. Type III hard anodizing produces a surface hardness comparable to sapphire and adds only 25 to 50 microns of thickness.
Powder coating, by contrast, applies a separate layer of material on top of the aluminum surface. A typical powder coat adds 50 to 80 microns of thickness, which is more than anodizing but still thin enough for most flashlight applications. The powder coat film is softer than hard anodizing but significantly harder than paint, providing good scratch and chip resistance for everyday carry use.
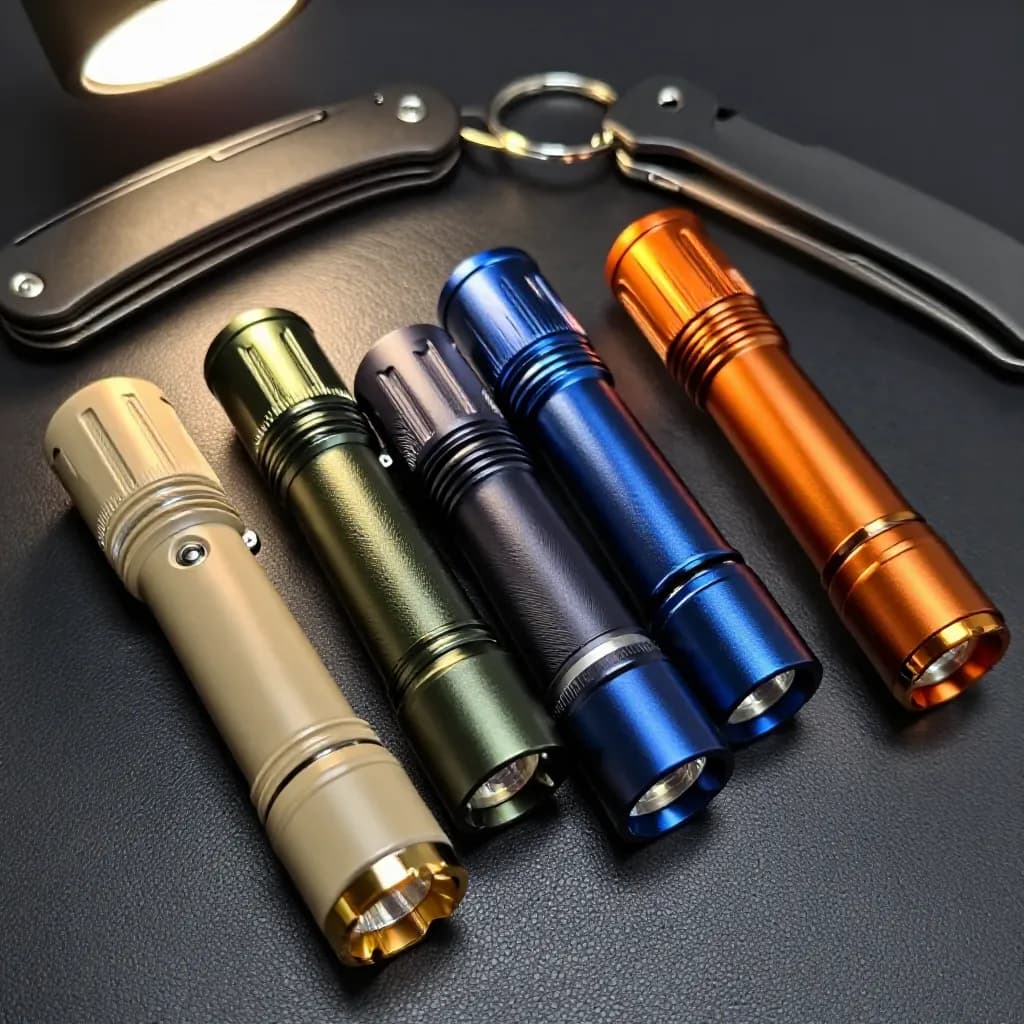
The key advantage of powder coating is color and finish variety. While anodizing is limited to a relatively narrow range of colors — with black, grey, blue, red, and green being the most common — powder coating offers hundreds of colors plus metallic, textured, matte, gloss, and specialty effects. A flashlight body can be finished in candy apple red, hammered copper, matte olive drab, or any other color imaginable.
The trade-off is dimensional. The thicker powder coat film means that threads, O-ring grooves, and other precision features need to be masked or accounted for in the design. On a flashlight where the head, body tube, and tail cap must thread together precisely, coating thickness on threaded surfaces can cause fitment issues if not managed properly.
Preparing Flashlight Bodies for Powder Coating
Flashlight bodies require meticulous preparation before powder coating. These are precision-machined components with tight tolerances, and any contamination or improper masking will result in functional problems or poor finish quality.
If the flashlight body is currently anodized, the anodizing must be stripped before powder coating. Powder will not adhere reliably over anodized surfaces, and the combination of the two finishes creates an unnecessarily thick layer that can cause fitment issues. Chemical stripping removes the anodizing cleanly, leaving bare aluminum ready for pretreatment and coating.
Masking is the most critical step for flashlight bodies. All threads — head threads, tail cap threads, and any intermediate body tube threads — must be masked to maintain proper engagement and smooth operation. O-ring grooves must remain uncoated to maintain their designed seal compression. Battery contact surfaces, switch interfaces, and any electrical contact points need masking to ensure proper conductivity.
The interior bore of the flashlight body should also be masked in most cases. The battery tube needs to maintain its designed diameter for proper battery fit, and any coating inside the tube could interfere with battery insertion or electrical contact. Some builders choose to coat the exterior only, leaving the interior as bare machined aluminum.
After masking, the bare aluminum surfaces are pretreated with a conversion coating to promote adhesion. Aluminum is reactive and forms a natural oxide layer quickly after machining, so pretreatment should happen promptly after stripping and cleaning to ensure the best possible bond between the metal and the powder.
Custom Colors and Tactical Finishes
The color possibilities for powder-coated flashlights are virtually unlimited, and this is where the format truly shines for enthusiasts. Production flashlights are overwhelmingly black or grey, making a custom color an instant conversation piece and a way to quickly identify your light in a group setting.
Tactical and outdoor users gravitate toward earth tones and camouflage-friendly colors. Flat dark earth, olive drab, coyote tan, and foliage green are popular choices that provide a non-reflective, low-visibility finish suitable for field use. These colors are readily available in matte powder formulations that eliminate the glare associated with glossy finishes.
For EDC enthusiasts who carry their flashlight as a personal accessory, bolder colors and effects are popular. Deep metallic blues, burnt orange, candy red, and even multi-color fade effects turn a utilitarian tool into a statement piece. Textured finishes like wrinkle and sandstone add tactile interest and improve grip — a functional benefit that also looks distinctive.
Cerakote is often mentioned alongside powder coating in flashlight discussions, and the two serve different niches. Cerakote is thinner and can be applied in more detailed patterns, making it better for multi-color camouflage patterns and fine graphic work. Powder coating is thicker and more durable for single-color applications, making it better for solid colors and textures where maximum chip resistance is desired. Many flashlight enthusiasts have lights finished in both methods for different purposes.
Grip and Texture Enhancements
Beyond aesthetics, powder coating can improve the functional grip of a flashlight body. Smooth anodized aluminum can be slippery when wet or when handled with gloves, and while knurling addresses this mechanically, powder coating textures offer an additional or alternative approach to improving grip.
Wrinkle texture powder coatings create a raised, irregular surface pattern that significantly improves grip compared to smooth finishes. The texture provides purchase for fingers and resists slipping even when the light is wet or the user is wearing gloves. For tactical and outdoor users, this improved grip can be the difference between maintaining control of the light and dropping it at a critical moment.
Sandstone and fine texture powders offer a more subtle grip enhancement. These finishes feel slightly rough to the touch — similar to fine sandpaper — without the pronounced peaks and valleys of a wrinkle texture. They provide moderate grip improvement while maintaining a more refined appearance that some users prefer for everyday carry.
The interaction between knurling and powder coating texture is worth considering. Aggressive knurling combined with a textured powder coat can create a surface that is almost too grippy, making the light uncomfortable to hold for extended periods. For knurled bodies, a smooth or lightly textured powder finish often provides the best balance. For smooth-bodied flashlights without knurling, a more aggressive powder texture compensates for the lack of mechanical grip features.
Durability in Everyday Carry Use
EDC flashlights live in pockets, clipped to belts, tossed in bags, and handled dozens of times a day. The finish on an EDC light needs to withstand constant contact with keys, coins, pocket knives, and other hard objects that share pocket space. It also needs to resist the oils and moisture from hands, and the occasional drop onto hard surfaces.
Powder coating performs well in this demanding environment, though differently than anodizing. Where hard anodizing resists scratching through sheer surface hardness, powder coating resists damage through its thickness and flexibility. A scratch that would penetrate a 25-micron anodized layer might only mark the surface of a 60-micron powder coat without reaching the aluminum underneath.
Pocket wear is the most common form of finish degradation on EDC lights. The constant rubbing against fabric and other pocket contents gradually wears any finish over time. Powder coating shows this wear differently than anodizing — rather than the bright aluminum showing through as it does with worn anodizing, powder coating tends to develop a polished or burnished appearance at wear points, which many users find attractive.
Drop resistance is another practical consideration. When a flashlight hits concrete or asphalt, the impact point experiences extreme localized stress. Powder coating's flexibility allows it to absorb some impact energy without cracking, though severe impacts will still chip the coating. The thicker film provides more material to absorb damage before the aluminum substrate is exposed.
DIY Powder Coating for Flashlight Modders
The flashlight modding community is inherently hands-on, and many modders have added powder coating to their workshop capabilities. A small home powder coating setup is well suited to flashlight-sized parts, and the investment in equipment is modest compared to the cost of outsourcing multiple custom finishes.
A compact toaster oven or small dedicated curing oven provides adequate space for flashlight bodies and components. Entry-level electrostatic powder guns deliver sufficient control for the small, cylindrical parts typical of flashlight work. The main investment beyond equipment is in powder inventory — building a collection of colors and textures that allows for creative experimentation.
The learning curve for powder coating flashlight bodies centers on masking and thickness control. Achieving consistent, thin coats on small cylindrical parts requires practice with gun distance, powder flow rate, and voltage settings. Start with practice pieces — aluminum tubes or scrap flashlight bodies — before committing to a finished build.
Home coating also enables rapid prototyping of color schemes and finishes. A modder can coat a body in one color, evaluate it, strip it, and try another color in a single afternoon. This iterative approach to finish selection is impractical with outsourced coating but natural in a home setup. Many modders develop signature colors or finishes that become associated with their work, building a personal brand within the flashlight community.
Maintaining and Refreshing Powder-Coated Flashlights
Day-to-day maintenance of a powder-coated flashlight is simple. Wipe the body with a soft cloth to remove fingerprints and pocket lint. For deeper cleaning, a damp cloth with mild soap removes accumulated grime without affecting the finish. Avoid solvents and abrasive cleaners, which can dull or damage the coating surface.
The pocket clip area is typically the first place to show wear on an EDC flashlight. The constant spring tension of the clip against the body creates a wear point that gradually thins the coating. Some users apply a small piece of clear protective film under the clip to reduce this wear, while others accept it as part of the light's character.
If the powder coating becomes significantly worn or damaged, the flashlight body can be stripped and recoated. This is one of the advantages of powder coating over anodizing — recoating is straightforward and can be done repeatedly without degrading the base aluminum. Each recoating is an opportunity to change colors or try a different finish, keeping the flashlight fresh and personalized.
For flashlight collectors who rotate through multiple lights, proper storage helps maintain finish quality. Storing lights individually in pouches or padded cases prevents them from rubbing against each other and causing unnecessary wear. Silica gel packets in storage containers help control humidity and prevent any moisture-related issues with the coating or the flashlight's internal components.
Frequently Asked Questions
Is powder coating better than anodizing for flashlights?
Neither is universally better — they serve different needs. Anodizing is thinner and harder, making it ideal for hard-use tactical lights. Powder coating offers far more color and texture options, making it better for custom builds and personal expression. Many enthusiasts have lights with both finishes.
Will powder coating affect flashlight thread engagement?
It can if threads are not properly masked. The 50 to 80 micron coating thickness will interfere with precision threads if applied to threaded surfaces. All threads should be masked before coating to maintain proper fit and smooth operation.
Can powder coating improve flashlight grip?
Yes. Textured powder finishes like wrinkle and sandstone significantly improve grip compared to smooth anodized surfaces. This is especially beneficial for wet conditions or gloved use. The texture choice should complement any existing knurling on the body.
How does powder coating wear compare to anodizing on EDC lights?
Powder coating wears differently than anodizing. Rather than showing bright aluminum at wear points, powder coating tends to develop a polished or burnished appearance. The thicker film means it takes longer for wear to reach the base metal, but the softer surface shows marks more readily than hard anodizing.
Can I powder coat a flashlight body at home?
Yes. Flashlight bodies are well suited to home powder coating setups with compact ovens and entry-level guns. The main skills to develop are precise masking of threads and O-ring grooves, and consistent thin-coat application on small cylindrical parts.
Ready to Start Your Project?
From one-off customs to 15,000-part production runs — get precise pricing in 24 hours.