Powder coating rims at home is absolutely possible, and it has become one of the most popular DIY powder coating projects among automotive enthusiasts. With the availability of affordable home powder coating equipment, the process is more accessible than ever. However, wheels are among the more challenging DIY powder coating projects due to their size, weight, and the performance demands placed on the finished coating.
Consumer
Can You Powder Coat Rims at Home? A DIY Guide
Sundial Powder Coating·April 22, 2026·9 min
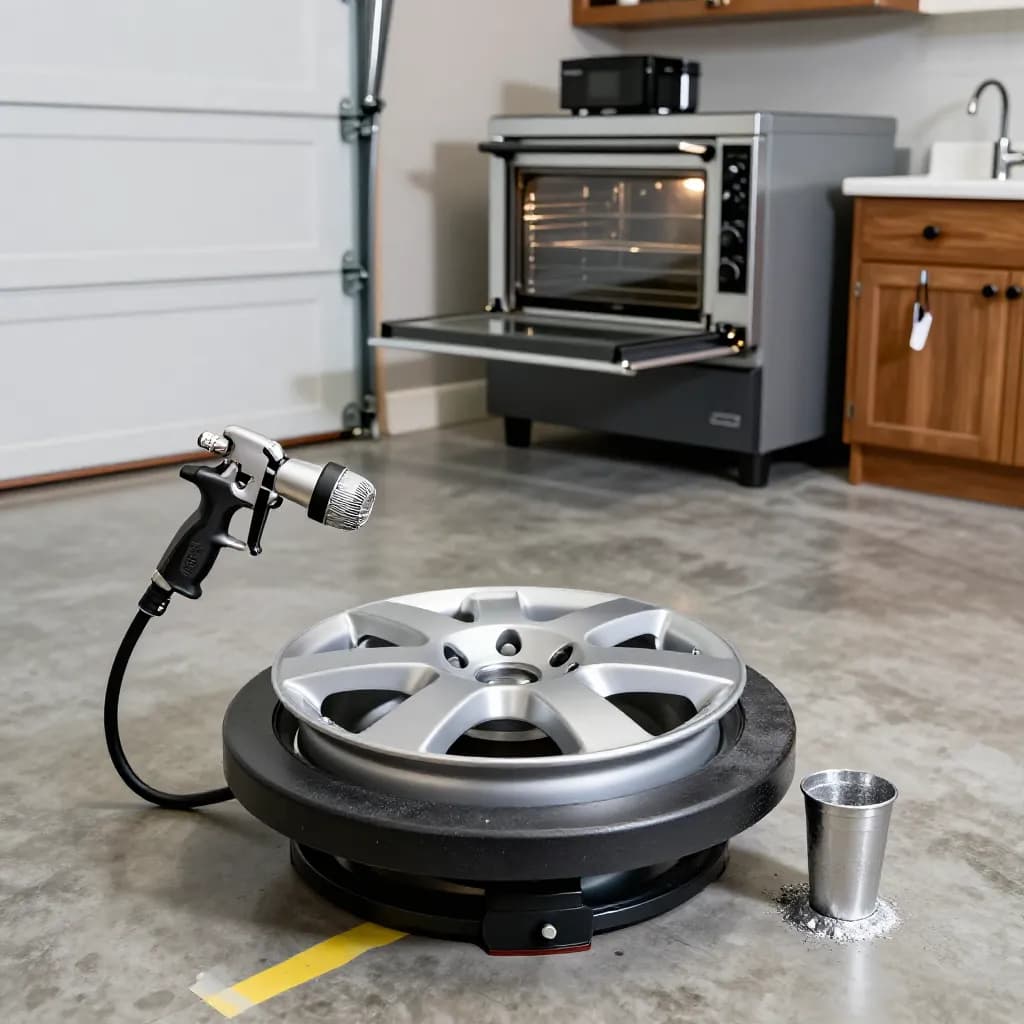
The biggest practical challenge is the curing oven. Standard powder coatings require curing at 180 to 200 degrees Celsius for 15 to 20 minutes, and the oven must be large enough to accommodate a wheel — typically 18 to 22 inches in diameter for modern vehicles. Purpose-built powder coating ovens in this size range are available for home use, and some enthusiasts build their own ovens from insulated panels and heating elements. A standard kitchen oven is too small for most wheels, though it may work for smaller motorcycle or ATV rims.
Ready to Start Your Project?
From one-off customs to 15,000-part production runs — get precise pricing in 24 hours.
On This Page
Yes, You Can Powder Coat Rims at Home — With the Right Setup
Beyond the oven, you will need an electrostatic powder gun with a compressor, abrasive blasting equipment for surface preparation, and a clean workspace for powder application. The total investment in equipment can be significant, but if you plan to coat multiple sets of wheels or other automotive parts, the per-project cost becomes very reasonable compared to professional coating.
Equipment You Will Need
A successful home wheel powder coating setup requires several key pieces of equipment. The electrostatic powder gun is the core tool — it charges the powder particles and sprays them onto the grounded wheel. Entry-level powder guns suitable for home use are widely available and produce good results for occasional projects. Higher-end guns offer better powder flow control, more consistent charging, and faster application, which become important if you plan to coat wheels regularly.
The curing oven is the most significant equipment investment. For wheels, you need an oven with an internal dimension of at least 24 inches in width and depth, and sufficient height to accommodate a wheel standing upright or lying flat on a rack. Electric ovens designed for powder coating are available in appropriate sizes, or you can build a custom oven using insulated panels, heating elements, and a temperature controller. The oven must be capable of maintaining a stable temperature of 200 degrees Celsius throughout the curing cycle.
Surface preparation equipment includes a blast cabinet or portable blasting setup with appropriate media — aluminum oxide is the most versatile choice for wheel preparation. You will also need an air compressor capable of supplying adequate volume and pressure for both blasting and powder application, hanging hooks or a rotating fixture for holding the wheel during spraying, and personal protective equipment including a respirator, safety glasses, and gloves. A clean, dust-free workspace is essential for achieving a quality finish.
Step-by-Step Process for Coating Rims
The process begins with removing the tires from the rims. While it is technically possible to mask the tire and coat the wheel with the tire mounted, this approach compromises the coating coverage on the bead seat area and risks heat damage to the tire during curing. For the best results, the tires should be removed and the wheels coated bare.
Next, remove all wheel weights, valve stems, and any center caps or trim rings. Inspect the wheels for damage — cracks, bends, or severe curb rash should be repaired before coating. Light curb damage can be sanded smooth, but structural damage requires professional wheel repair. Clean the wheels thoroughly with a degreaser to remove brake dust, road grime, and any tire mounting lubricant.
Blast the entire wheel surface with aluminum oxide media to remove old coating, oxidation, and contaminants while creating the surface profile needed for powder adhesion. For aluminum wheels, use moderate blast pressure to avoid distorting thin sections. After blasting, blow off all residual media with compressed air and wipe the surface with a tack cloth. Apply the powder using your electrostatic gun, building up an even coat of 60 to 80 microns. Hang or rack the wheel in the oven and cure according to the powder manufacturer's specifications. After cooling, inspect the finish and apply a second coat if needed.
Common Mistakes and How to Avoid Them
The most common mistake in DIY wheel powder coating is inadequate surface preparation. Rushing through the blasting step or failing to remove all old coating, oxidation, and contaminants will result in adhesion failures — the powder may look fine initially but will chip or peel during use. Take the time to blast every surface thoroughly, including the back side of the spokes, the barrel interior, and the bead seat areas.
Inconsistent film thickness is another frequent issue. Applying too much powder results in orange peel texture, runs, or sags, while too little powder leaves thin spots that are vulnerable to chipping and corrosion. Practice your spray technique on scrap metal before coating your wheels, and use consistent gun-to-surface distance and sweep speed. Multiple thin passes are better than one heavy pass.
Oven temperature accuracy is critical and often overlooked. Many home ovens have temperature variations of 10 to 20 degrees across the interior, and the displayed temperature may not match the actual temperature at the part surface. Use an independent oven thermometer or thermocouple to verify the actual temperature at the wheel surface during curing. Under-curing results in a soft, easily damaged finish, while over-curing can cause yellowing or brittleness. Following the powder manufacturer's cure schedule precisely — both temperature and time — is essential for a durable finish.
Choosing the Right Powder for Wheels
The powder selection for wheels should prioritize durability, chip resistance, and chemical resistance, as wheels are exposed to some of the harshest conditions on a vehicle. Polyester powder coatings are the standard choice for wheels, offering excellent UV resistance, color retention, and mechanical durability. Superdurable polyester formulations provide enhanced weathering resistance for wheels that will be exposed to road salt, brake dust, and harsh cleaning chemicals.
For maximum durability, consider a two-coat system with an epoxy primer and a polyester topcoat. The epoxy primer provides superior adhesion and corrosion protection at the metal interface, while the polyester topcoat provides UV resistance and the desired color and finish. This system is more work than a single coat but provides significantly better long-term performance, particularly for wheels used in winter conditions with road salt exposure.
Color and finish choices for wheels are extensive. Gloss black, satin black, gunmetal, bronze, and silver are perennial favorites, but any color in the powder coating spectrum is available. Metallic and pearl-effect powders are popular for wheels, adding depth and visual interest. Clear coats can be applied over metallic base coats for additional protection and depth. Textured finishes are less common on wheels but can be used for a unique appearance — just be aware that textured surfaces may be more difficult to clean than smooth finishes.
Masking and Special Considerations for Wheels
Proper masking is important for wheel powder coating to ensure that the coating does not interfere with tire mounting, wheel balancing, or hub fitment. The valve stem hole should be plugged with a high-temperature silicone plug to prevent coating from blocking the hole. Lug nut holes should also be plugged or masked to maintain proper lug nut engagement and torque.
The hub bore — the center hole that fits over the vehicle's hub — should be masked if it is a hub-centric fitment, as coating in this area can prevent the wheel from seating properly on the hub. For lug-centric wheels, the hub bore is less critical but should still be kept reasonably clean. The bead seat areas where the tire seals against the rim can be coated — in fact, coating these areas provides corrosion protection that helps maintain a good tire seal over time.
Wheel weight mounting surfaces are worth considering. If you use adhesive wheel weights, the coated surface actually provides a good bonding surface. For clip-on weights, the coating on the rim flange should be thin enough to allow the clip to grip securely. Discuss weight type with your tire installer before coating to ensure compatibility. After coating, have the wheels balanced by a professional tire shop before mounting on the vehicle.
When to Choose Professional Coating Instead
While DIY wheel powder coating is rewarding and cost-effective for enthusiasts who enjoy the process, there are situations where professional coating is the better choice. If you do not have or cannot justify the investment in a sufficiently large curing oven, professional coating is the practical option. Attempting to cure wheels in an undersized oven or with inadequate temperature control will produce poor results.
For high-value or rare wheels — such as original equipment wheels on a classic car restoration or expensive forged aftermarket wheels — the risk of a DIY mistake may not be worth the savings. Professional coaters have the experience and equipment to handle these parts with the care they deserve, and the cost of professional coating is small relative to the value of the wheels.
Complex multi-color or multi-finish wheel designs — such as machined lip with painted spokes, or two-tone color schemes — are significantly more challenging to execute at home. These designs require precise masking between colors, multiple coating and curing cycles, and careful handling between steps. Professional shops with experience in multi-finish wheel work can achieve results that are difficult to replicate in a home setup. If your desired finish involves multiple colors, clear coat over metallic, or machined accents, professional coating is likely the better path.
Maintaining Powder-Coated Wheels
Proper maintenance extends the life of powder-coated wheels and keeps them looking their best. Regular cleaning is the most important maintenance step — brake dust, road salt, and grime should be washed off regularly to prevent chemical attack on the coating surface. Use a pH-neutral wheel cleaner and a soft brush or microfiber cloth. Avoid highly acidic or alkaline wheel cleaners, as these can dull or damage the powder coating over time.
Brake dust is particularly important to remove promptly. The metallic particles in brake dust can embed in the coating surface and cause staining if left in place for extended periods. For vehicles with aggressive brake pads that produce heavy dust, weekly cleaning of the wheels is recommended. A quick rinse with a pressure washer after each drive can help prevent dust buildup between thorough cleanings.
Minor chips and scratches in the coating should be touched up promptly to prevent corrosion from starting at the damage site. Touch-up paint matched to the powder coating color can be used for small repairs, though the finish will not be identical to the original powder coating. For more significant damage, the wheel can be stripped and recoated. Applying a quality wheel sealant or ceramic coating over the powder coating provides an additional layer of protection and makes cleaning easier by reducing brake dust adhesion.
Frequently Asked Questions
How big of an oven do you need to powder coat rims?
For standard car wheels of 18 to 22 inches in diameter, you need an oven with internal dimensions of at least 24 by 24 inches and sufficient height to accommodate the wheel. Purpose-built powder coating ovens in this size range are available, or you can build a custom oven. A standard kitchen oven is too small for most car wheels.
Can you powder coat rims without removing the tires?
It is technically possible but not recommended. The tire prevents proper coating of the bead seat area, and the curing oven temperature of 180 to 200 degrees Celsius will damage or destroy the tire. For the best results and complete coverage, tires should be removed before powder coating.
How much does it cost to set up a home powder coating system for wheels?
A basic home setup including a powder gun, compressor, blast cabinet, and a suitably sized curing oven typically ranges from a moderate to significant investment depending on equipment quality. The oven is usually the largest single expense. The per-wheel cost of powder is relatively low, making the system economical if you plan to coat multiple sets of wheels or other parts.
How long does DIY powder coating last on wheels?
When properly applied with thorough surface preparation and correct curing, DIY powder coating can last as long as professional coating — typically five to ten years or more on a daily-driven vehicle. The key factors are surface preparation quality, film thickness consistency, and accurate curing temperature and time. Cutting corners on any of these steps will reduce durability.
Can you powder coat chrome wheels at home?
Chrome wheels can be powder coated, but the chrome plating must be completely removed first through abrasive blasting or chemical stripping. Powder coating does not adhere well to smooth chrome surfaces. Removing chrome is labor-intensive and may reveal surface imperfections that were hidden by the plating. This adds significant preparation time to the project.
Ready to Start Your Project?
From one-off customs to 15,000-part production runs — get precise pricing in 24 hours.